- Â
í Assignments
í Assignment 10
For Monday the 7th:
1.Please complete the tutorial for surface driven cuts in Mastercam (the spoon) located on the CNC site : http://risdbankcnc.squarespace.com/surface-cuts-hidden
2.Begin developing the design of your spoon. The challenge and review in class provided a basic overview of the construction method we’d like you to use. There is a video that covers a similar process here: https://vimeo.com/111593972
Dimensions of the spoon must be within 2″ wide x 8″ long x.75″ deep. No area should be under .0625″ in thickness, and this should only be at the thinnest point where the material tapers up from there. These will be cut from solid wood so design accordingly considering the strength and grain.
For class tomorrow have sketches of your design and at a minimum orthographic views completed in Rhino, but we’d encourage you to have the 3d model at least started so we can assist with any challenges you run into.
í Assignment 8: Finalize Stool Design, prepare file for MasterCAM
It appears there wasn’t an assignment posted last week, so we apologize for that oversight. Please upload a photo(S) of your model from this week to your google drive folders (in a sub-folder within the plywood stool folder named “Phase 2”) as well as a screen shot of your nesting layout.
For next week, please revise and refine your designs as was discussed during the reviews in class. We are falling a bit behind schedule at this point but this phase of this project is to finalize the design, resolving issues related to form, dimensions, structure and joinery. For some of you, this means more incremental improvements, others will require more drastic reworking of your design.
For next week, you will be required to create another model of your design. You can create another 1:2 scale model however for some we encourage you to make a full scale model. The material thickness should be scaled appropriately in either. If you decide to make a 1:1 model, you should use 1/2″ foam core and cut by hand. You can use the paper model techniques of the make2d command in Rhino to create patterns that you can print full scale on the plotter in the computer lab.
So we don’t fall too far behind, please prepare your rhino file for mastercam. Remember that MasterCam will be using contour cuts, so slots can be cut with a single line versus the laser cutter’s use of an outline. We can adjust the tool to cut on the center or either side of the lines, so you will need to plan accordingly when laying out the geometry.
Some things to keep in mind:
- you can only use three toolpath types for this project
- contour
- drill
We would recommend you attempt to setup your mastercam file, but understand that we didn’t have a chance to demo today in class. We’ll do our best to come in this week for assistance with mastercam outside of class hours.
By next class the designs of your objects must be resolved fully. Please upload your stool 3dm files as well as photos of your models and nesting layouts as soon as you are able this week and email Chris and Cutter so we can review.
í Assignment 5
1.Cat Face Tutorial
Follow along with the Cat Face Tutorial to create your own MasterCAM file.
2. Install Parallels and Windows (if necessary) and MasterCAM
You are entitled to a free copy of Windows 10, which you can access from RISD’s “on the hub” store.
To install Windows on an Apple computer, we recommend using Parallels. For now, we recommend you start with the free trial. The free trial is only good for 14 days. When you are ready to purchase, you can get it from “on the hub”.
MasterCAM Home Learning Edition 2017 will be available from Marilyn on a USB key. You can borrow the key to drag a copy to your computer, then return it to her.
3. Name Plate – due Monday 4/2 at 9am!
Create a name plate for your self, to be executed in 1/2″ thick MDF on the CNC router. We will supply the material and will cut all of the names in one go. Some requirements:
- Students are required to draw the letters for their name plate as “single stroke” fonts
- The names will be cut with the following configuration
- contour toolpath, with compensation turned off (cutting on the center of the line)
- cut with the 1/4″ ball end cutter
- cut to a depth of 1/8″
- The outside profile will be cut with the following configuration
- contour toolpath, compensating to cut to the outside as a climb cut
- cut with the 1/2″ flat-end cutter
- cut depth of 1/2″
- stepdown of 1/4″
- four tabs at .75″ wide, .125″ thick (use Vertical Moves, NOT RAMP MOVES!!!)
- Name Plates must fit within a 9″ x 14″ rectangle
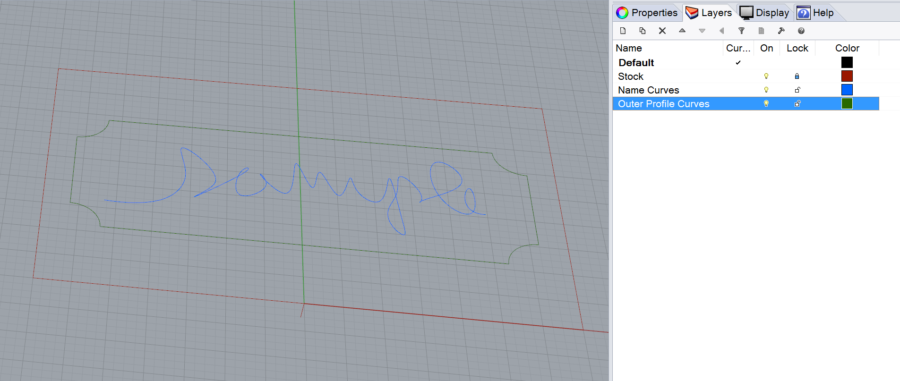
You will be required to submit a MasterCAM file and a Rhino file for this project. Use the Rhino file below as a template to fit your Name Plate within. Use the layers included in this file as follows:
- Place your name curves on the layer called “Name Curves”
- Place the outside contour on the layer called “Outer Profile Curves”
Name your Rhino and MasterCAM Files with the following convention: Firstname_Lastname_NamePlate
Place these files in your personal folder and the shared folder called “Name Plate”
Get the Template Here. The template includes sample curves for the name and outer profile. Delete these curves – don’t include them in the file you post the google drive.
4. Plywood Stool Phase 1
Working from the CNC Plywood Stool project brief, begin developing your design for this project. The primary deliverable for this phase is a 1:3 scale model. If possible, use a material that approximates the scaled thickness. You are welcome to use the laser cutter for this project, but be aware that only certain materials can be cut with this machine. Work iteratively, on-screen with Rhino, and off-screen with sketches and study models. Save all of your process work.
Create a folder in the shared google drive with your name and place in that folder:
- a photo of your scale model named “FirstnameLastname_PlywoodScaleModel.jpg”
- a screenshot or rendering of your rhino model named “FirstnameLastname_PlywoodModelRendering.jpg”
- and an image of your nesting scheme for the parts named “FirstnameLastname_PlywoodNesting.jpg”
5. Drive Tidy-Up
Make sure your projects to date are properly organized in the google drive. Most projects require content is placed in both the shared drive and your personal folder. Look at back at the previous assignment to make sure your work is where it needs to be, following the specifications of the assignments. Failure to do so will affect grading.
í Assignment 4
1. Paper Model Round 2 (final)
Revise your Rhino model as needed and create a final paper model for this project. This model should be a well crafted, carefully proportioned likeness of your chosen object, demonstrating thoughtful decisions about what to include as part of the form, what to represent with graphics, and how to abstract compound curving surfaces into simple, developable surfaces. Keep in mind that you are expected to include some representation of the color, materials, and finish of the original object – this can be very literal or more abstract in the way you make this representation. For now, focus on creating the model, but we will ask you to create a slideshow summarizing your work and process. Be sure that you are working in an organized fashion in Rhino as we will review the files.
2. Revisions
You may continue to revise and improve your work for the first two assignments.
í Assignment 3
1: Mustard Bottle Tutorial
Follow along with the tutorial that shows how to build a mustard bottle. Try as best as you can to copy the rendering shown in the tutorial page.
2: Paper Model, Phase 1
Working from the Paper Model project Brief:
- build a model of your object in Rhino
- translate this model into developable surfaces
- unroll the surfaces into a pattern that can be cut
- revise and modify as necessary (add tabs, etc)
- cut out this pattern in paper by hand from a printed pattern, with the laser cutter, or with the digital die cutter.
- assemble
- experiment with media as necessary to create a representation of the object’s materials
Place the following content into a new google drive folder called “Firstname Lastname Paper Model Phase 1”, put this folder in your personal folder and the shared folder for this project. In this folder, put the following images
- a Keyshot rendering on a neutral background. Render the model used to generate your patterns using “toon” shaders to provide an impression of the color(s) your paper model will use
- screenshot in orthographic view of your cut pattern – this screenshot should show your pattern as curves, not surfaces. The commands DupEdge, DupBorder, and DupFaceBorder will be helpful in getting curves from your unrolled surfaces.
- photo of your assembled paper model
3. 3D Printing
If you haven’t already done so, submit one of your glasses for 3D printing. We are pushing back deadline for this part of the assignment.
4: Chair Study Revisions
Rebuild at least one of your chair models to more accurately capture the form and proportions of the physical examples. Think critically about the appearance of your model vs. what you see when looking at the chair. Use photographs as reference if necessary.
Re-render the chairs in a neutral setting, using only simple extrusions as the pedestals to create an unobtrusive environment for the rendering. The goal is to create a rendering that demonstrates competency creating near photo-realistic renderings of realistic looking image of a plausible photoshoot. Follow the specifications below:
- the armchair should be shown with an opaque black gloss paint, with natural caning for the seat and back
- one of the other chairs should be shown in an opaque satin paint finish, in either white or red
- one of the other chairs should be shown with a clear satin lacquer over natural wood
- use this image as your backplate
- use a smooth, opaque, matte or satin finish for the pedestals – choose white, gray, or neutral shades of colors.
- make sure “ground shadows” is turned on (environment tab)
You are also welcome and encouraged to continue revising your glasses, especially the renderings.
í Assignment 2
1. Comment on Someone else’s project
A. Due March 2
In response to their work on the drinking glasses part of Assignment 1, write a very brief statement commenting on the work of the classmate whose last name follows your alphabetically (the last person in this order should comment on the first person). Describe at least one positive and one negative aspect of their design, but also make specific suggestions for how their renderings can be improved. This comment is required, but you are also welcome and encouraged to comment on anyone’s work. Use Google Doc’s commenting feature to do this.
2. Improve Your Post for Assignment 1
Due March 5
If your post from the first assignment had any problems, or if suggestions were made that could improve your design or rendering, you have the chance to go back and make improvements. Technically this is not required, but the improved submission will be considered for grading purposes, should you choose to revise. If you choose to improve your work, modify your document, adding the new content so we can see the improvements in relation to the original content. Don’t delete the original work.
3. 3D Print one of your glasses
Due March 12
Select one of your glasses to make a 3D print of. Save your this model as an STL and submit it for printing on one of the 3D printers in the Bank Building second floor.
4. Chair Study: Models and Rendering.
Due March 5
Working from the brief for the Chair Study project, you should create the following content:
Rhino File
- Build a model of each chair.
- Begin by drawing 3D curves that faithfully capture the proportions and scale of the chairs.
- Most of the bentwood components should be built with the pipe tool, with the majority of remaining surfaces built as extrusions or surfaces from planar curves (“planarsrf” command).
- Build all chairs in a single Rhino file.
- Place each chair on its own set of layers
- Use nesting layers to organize the parts of the chair
- Build each chair to have a consistent relationship with the origin (if one is centered over the origin, make all of them centered, for example)
- Keep all important curves on layers to facilitate organization, management, and editing
Put your Rhino folder in your personal Google Drive folder. Begin to organize your folder with sub folders for each project so faculty can easily navigate and find your work.
Rendering
- Build a scene in Rhino using basic “pedestal” elements (extrusions) as props for your chair models to provide an interesting backdrop to render within. Create at least three renderings using this scene: at least one that shows all three chairs in their entirety, and at least one that has the chair closest to the camera partially cropped.
- Choose at least two images from this post on Dezeen and use these images as backdrops to create renderings that show your chair models in the spaces. These renderings must include at least one of your chairs, but can also include more than one instance of each chair or chairs.
- Bonus: Create a surreal or fantastic scene using a backdrop image that places your chair in a setting that is somehow surreal, unexpected, or otherwise out of the ordinary
- All renderings should be submitted at 1,200 pixels wide, and at least one renderings from each series should use wood (without opaque finish, so the grain is visible) as the material
Put your renderings in your personal google drive folder and the “chair rendering folder”. Come up with a consistent, logical naming convention that begins with your first name and clearly differentiates between the three series of renderings. Use this for all of your renderings. For example: Specce_Chair_Scene1.jpg, Specce_Chair_Interior1.jpg, Specce_Chair_Surreal.jpg
5. Paper Model Selections
Select and bring in several objects for consideration to use in the next project, Paper Model.
í Assignment 1
Part 1: Software
Make sure your laptop is set up with working versions of Rhino and Keyshot.
Part 2: Tutorials
Complete the “Flashlight” and “Pull Toy” tutorials from the Rhino 5 user’s guide.
Part 3: Glasses
Working from the brief for Project 1: Glasses, create the following content:
1. Development Sketches
Sketching is versatile tool for a designer, and is particularly helpful to resolve forms and solve modeling challenges when working with 3D CAD. Use sketching to develop the initial concept and form of your glasses’ design. Sketch on 8.5” x 11” sheets of paper. Scan or take legible photographs of the sketch(es) that guided your modeling. We recommend using Photoshop to clean up this image. Bring your sketches to class next week.
2. Rhino File
Your Rhino file must satisfy the following criteria:
- Each glass must be modeled solely with a single revolve
- Each glass must be a solid
- Place each glass on its own layer and name the layer accordingly
- Place each revolve curve on a sub-layer for each glass and name the layer accordingly
- Any construction geometry worth saving should be placed on a layer(s) with clear, logical naming and organizational strategy
- Align the revolve axis of each glass with the origin’s (0,0,0 point) Z-axis, with the base of the glasses resting on the Top CPlane
Put this file in your personal folder on the Google Drive. Name this file Lastname_Glasses.3dm
3. Rendering
Include 2 Renderings of your glasses:
- Front orthographic view showing all glasses
- Perspective view showing all glasses
Your renderings must satisfy the following criteria:
- horizontally align the glasses so they form a neat row, arranged in the following order (from left to right): wine glass, pint glass, water glass, juice glass
- leave equal spacing between each glass
- save your renderings in JPG format, resolution of 1200 pixels in width
4. Screenshot
Include a screenshot of your revolve curves with the control points turned on. Your screenshot must satisfy the following criteria:
- compose this screenshot in an orthographic view
- explode any joined curves
- horizontally align the revolve curves so they form a neat row, arranged in the following order (from left to right): wine glass, pint glass, water glass, juice glass
- leave equal spacing between each revolve curve
- save your screenshot in JPG format, with a maximum width of 800 pixels
5. Description
Write a brief text description of your design proposal. Your description must include the following content:
- 1 sentence profile of the museum, include the name of the museum, location of the museum, area(s) of focus (for example: contemporary art, civil war history, New England wildlife, etc)
- why your design is appropriate for this context
- 3 descriptive adjectives that characterize the aesthetic qualities of your designs
6. Google Doc
Create a google doc that includes all of the content listed above, in the order indicated below:
- Orthographic Rendering
- Descriptive Paragraph
- Perspective Renderings
- Screenshot of Curves
- Image(s) of Preliminary Sketch(es)
Name this file Lastname_Glasses. Save this document in your personal folder on the Google Drive, and add it to the “Glasses” assignment folder. To do this:
- use the ‘move to’ option when right clicking on the file
- navigate to the Glasses Assignment folder
- hold down the option/ctrl key to enable the ‘add here” function
This is how many assignments will be collected.
-
Classroom
-
