- Â
J glasses
B Saving as .STL for 3D Printing
In order to 3D print a model of one of your glasses, you will need to export it as an .STL file.
To do so you can follow these steps from Rhino:
- make sure the object is a solid. You can run the command “What” and if this tells you that the object is “closed” it is a sold. If it does not say it is cloed, you can run the command ShowEdges – this will allow you to display “naked” edges (edges that are not connected to another edge). If your model has naked edges, these are the edges that are open. If the opening is very small, the 3D printing software should be able to process your file successfully. The lab also has software that can “heal” small openings.
- Select the object, and then run the command “Export“. This will allow you to save only what you have selected.
- For the file format, choose .STL. Name your file and include your last name for easy reference in the 3D printing lab. Click export.
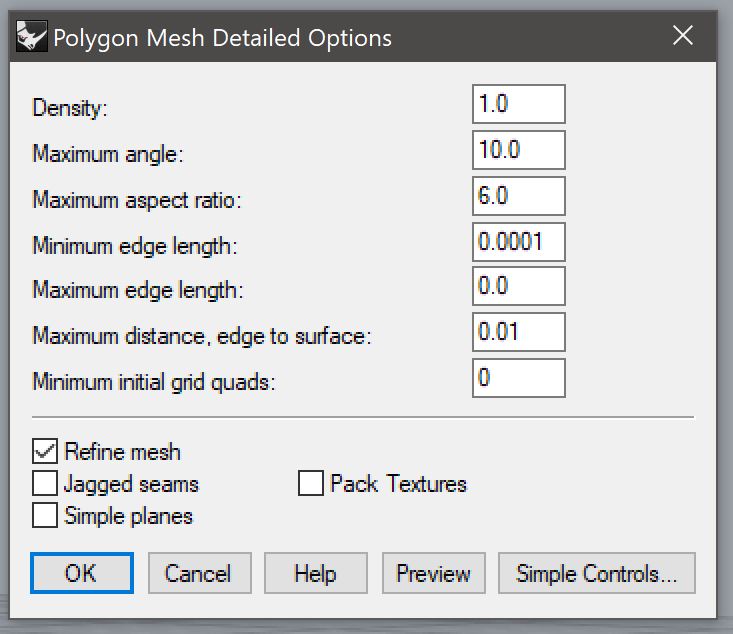
- a simple control dialogue will appear. On Windows, look for the option for “Detailed Controls”, on Mac you will see a little downward facing triangle. Use the settings shown below to ensure your model translates to a high resolution print
- Density: 1
- Maximum Angle: 10
- Maximum Aspect Ratio: 6
- Minimum Edge Length: .0001
- Maximum Edge Length: 0
- Maximum Distance, Edge to Surface: .01
- Maximum Initial Grid Quads: 0
- Refine Mesh: On
- Jagged Seams: Off
- Simple Planes: Off
- Pack Textures: Off
- You can click “Preview” to see how your model will be translated to planar polygons. Unless something looks really off, you can proceed by clicking “OK”
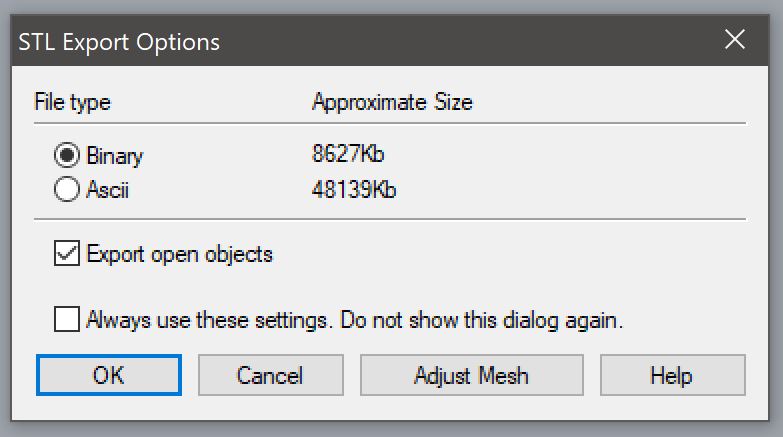
- In the next dialogue box, set the file type to binary and check the box for “Export Open Objects”, then click “OK”
Here are some screen shots showing the settings described above:
This file is now ready for 3D Printing. The monitors in the 3D printing lab in Bank building can you help you with the next steps.
Y New Tips For Rendering Glass in Keyshot
I know there was some difficulty getting the renderings of the glasses to look right. I did some research and it looks like the newer versions of Keyshot require a slightly different strategy to get the glass to look right. In my video I show making separate “bodies” for the glass and the liquid. This is done to avoid interference between the glass and the liquid where the surfaces are occupying the same space. The extra step is to separate (using explode or extractsrf) the top of the liquid – that would make contact with the air – from the liquid that would make contact with the glass. There are additional settings that need to be configured for each part. See a full explanation here:
https://blog.keyshot.com/2016/render-liquid-glass-keyshot

Here’s a quick test rendering I did:
Another feature that is relatively new to Keyshot is a setting called “transparency distance”. This setting is found on both the liquid and glass(solid) material and if you are trying to render a colored liquid it will be important to understand. Essentially, transparency distance can be understood as a color that correlates to the thickness of a part. If the part thickness is equal to the transparency distance, the material will be the color assigned to the transparency distance attribute. As the thickness decreases, the color becomes lighter and less saturated, and as the thickness increases, the color becomes a darker and more saturated. You can see a nice overview of this here:
https://blog.keyshot.com/2016/how-to-adjust-color-density-on-transparent-materials-in-keyshot
![]()
Some more detailed and technical discussion around this topic can be read in this forum post:
https://www.keyshot.com/forum/index.php?topic=19466.0

B Drinking Glass Demo Part 3: Rendering with Keyshot
Part 3: This Video demonstrates how to do a basic rendering with Keyshot, including how to set up the kinds of materials you may want to use for this project.
B Drinking Glass Demo Part 2: Volume Analysis
Part 2: How to measure the volume of your glass.
Commands used in this video:
- box
- booleansplit
- volume
B Drinking Glass Demo Part 1: Drawing and Revolving
Part 1: A review of the drawing and modeling techniques required to complete the drinking glass assignment.
Commands used in this video:
- Pictureframe
- Curve (control point curve)
- fillet
- BlendCRV
- Scale1D
- join
- explode
- revolve (full circle)
í Assignment 1
Part 1: Software
Make sure your laptop is set up with working versions of Rhino and Keyshot.
Part 2: Tutorials
Complete the “Flashlight” and “Pull Toy” tutorials from the Rhino 5 user’s guide.
Part 3: Glasses
Working from the brief for Project 1: Glasses, create the following content:
1. Development Sketches
Sketching is versatile tool for a designer, and is particularly helpful to resolve forms and solve modeling challenges when working with 3D CAD. Use sketching to develop the initial concept and form of your glasses’ design. Sketch on 8.5” x 11” sheets of paper. Scan or take legible photographs of the sketch(es) that guided your modeling. We recommend using Photoshop to clean up this image. Bring your sketches to class next week.
2. Rhino File
Your Rhino file must satisfy the following criteria:
- Each glass must be modeled solely with a single revolve
- Each glass must be a solid
- Place each glass on its own layer and name the layer accordingly
- Place each revolve curve on a sub-layer for each glass and name the layer accordingly
- Any construction geometry worth saving should be placed on a layer(s) with clear, logical naming and organizational strategy
- Align the revolve axis of each glass with the origin’s (0,0,0 point) Z-axis, with the base of the glasses resting on the Top CPlane
Put this file in your personal folder on the Google Drive. Name this file Lastname_Glasses.3dm
3. Rendering
Include 2 Renderings of your glasses:
- Front orthographic view showing all glasses
- Perspective view showing all glasses
Your renderings must satisfy the following criteria:
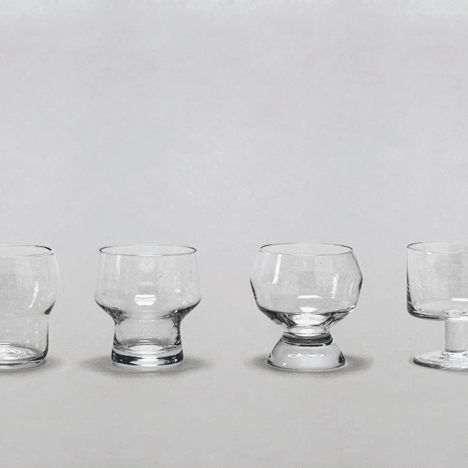
- horizontally align the glasses so they form a neat row, arranged in the following order (from left to right): wine glass, pint glass, water glass, juice glass
- leave equal spacing between each glass
- save your renderings in JPG format, resolution of 1200 pixels in width
4. Screenshot
Include a screenshot of your revolve curves with the control points turned on. Your screenshot must satisfy the following criteria:
- compose this screenshot in an orthographic view
- explode any joined curves
- horizontally align the revolve curves so they form a neat row, arranged in the following order (from left to right): wine glass, pint glass, water glass, juice glass
- leave equal spacing between each revolve curve
- save your screenshot in JPG format, with a maximum width of 800 pixels
5. Description
Write a brief text description of your design proposal. Your description must include the following content:
- 1 sentence profile of the museum, include the name of the museum, location of the museum, area(s) of focus (for example: contemporary art, civil war history, New England wildlife, etc)
- why your design is appropriate for this context
- 3 descriptive adjectives that characterize the aesthetic qualities of your designs
6. Google Doc
Create a google doc that includes all of the content listed above, in the order indicated below:
- Orthographic Rendering
- Descriptive Paragraph
- Perspective Renderings
- Screenshot of Curves
- Image(s) of Preliminary Sketch(es)
Name this file Lastname_Glasses. Save this document in your personal folder on the Google Drive, and add it to the “Glasses” assignment folder. To do this:
- use the ‘move to’ option when right clicking on the file
- navigate to the Glasses Assignment folder
- hold down the option/ctrl key to enable the ‘add here” function
This is how many assignments will be collected.
-
Classroom
-
