1.Cat Face Tutorial
Follow along with the Cat Face Tutorial to create your own MasterCAM file.
2. Install Parallels and Windows (if necessary) and MasterCAM
You are entitled to a free copy of Windows 10, which you can access from RISD’s “on the hub” store.
To install Windows on an Apple computer, we recommend using Parallels. For now, we recommend you start with the free trial. The free trial is only good for 14 days. When you are ready to purchase, you can get it from “on the hub”.
MasterCAM Home Learning Edition 2017 will be available from Marilyn on a USB key. You can borrow the key to drag a copy to your computer, then return it to her.
3. Name Plate – due Monday 4/2 at 9am!
Create a name plate for your self, to be executed in 1/2″ thick MDF on the CNC router. We will supply the material and will cut all of the names in one go. Some requirements:
- Students are required to draw the letters for their name plate as “single stroke” fonts
- The names will be cut with the following configuration
- contour toolpath, with compensation turned off (cutting on the center of the line)
- cut with the 1/4″ ball end cutter
- cut to a depth of 1/8″
- The outside profile will be cut with the following configuration
- contour toolpath, compensating to cut to the outside as a climb cut
- cut with the 1/2″ flat-end cutter
- cut depth of 1/2″
- stepdown of 1/4″
- four tabs at .75″ wide, .125″ thick (use Vertical Moves, NOT RAMP MOVES!!!)
- Name Plates must fit within a 9″ x 14″ rectangle
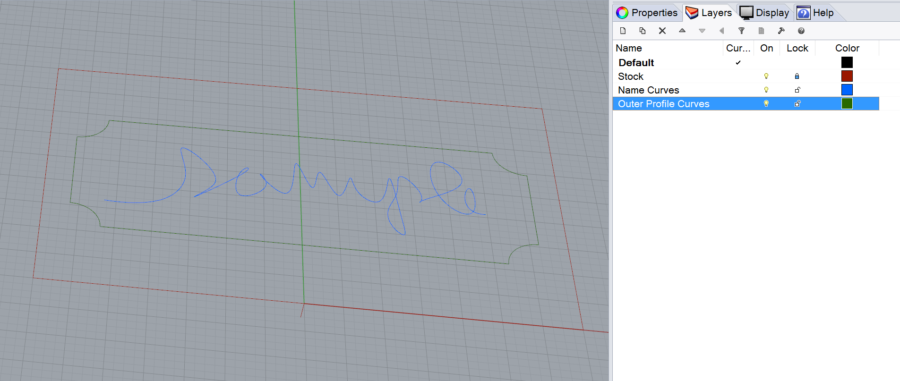
You will be required to submit a MasterCAM file and a Rhino file for this project. Use the Rhino file below as a template to fit your Name Plate within. Use the layers included in this file as follows:
- Place your name curves on the layer called “Name Curves”
- Place the outside contour on the layer called “Outer Profile Curves”
Name your Rhino and MasterCAM Files with the following convention: Firstname_Lastname_NamePlate
Place these files in your personal folder and the shared folder called “Name Plate”
Get the Template Here. The template includes sample curves for the name and outer profile. Delete these curves – don’t include them in the file you post the google drive.
4. Plywood Stool Phase 1
Working from the CNC Plywood Stool project brief, begin developing your design for this project. The primary deliverable for this phase is a 1:3 scale model. If possible, use a material that approximates the scaled thickness. You are welcome to use the laser cutter for this project, but be aware that only certain materials can be cut with this machine. Work iteratively, on-screen with Rhino, and off-screen with sketches and study models. Save all of your process work.
Create a folder in the shared google drive with your name and place in that folder:
- a photo of your scale model named “FirstnameLastname_PlywoodScaleModel.jpg”
- a screenshot or rendering of your rhino model named “FirstnameLastname_PlywoodModelRendering.jpg”
- and an image of your nesting scheme for the parts named “FirstnameLastname_PlywoodNesting.jpg”
5. Drive Tidy-Up
Make sure your projects to date are properly organized in the google drive. Most projects require content is placed in both the shared drive and your personal folder. Look at back at the previous assignment to make sure your work is where it needs to be, following the specifications of the assignments. Failure to do so will affect grading.
