- Â
5 Setup
( Potential Fix for MasterCAM HLE not working on Windows Computers
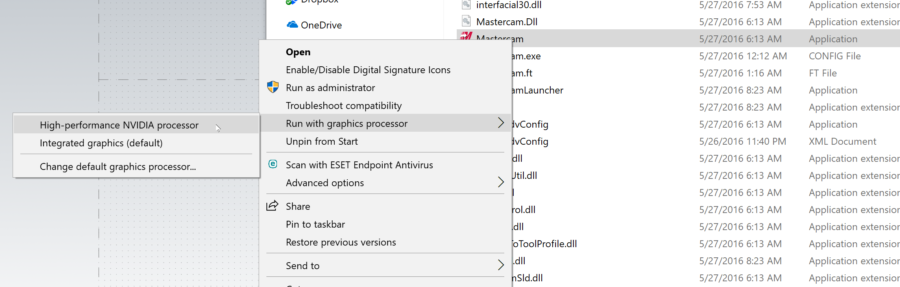
I have been looking into the issue some of you have been facing where MasterCAM hangs / crashes when it is loading. I may have found a potential fix for this. In digging around I have found this to solve the problem for me:
- Browse to the folder with the MasterCAM application in it (C:/Program Files/MasterCAMDemoHLE2017)
- Find the Mastercam Application file
- Right Click on the application > Run With Graphics Processor > High Performance Nvidia processor
It seems as if this issue is related to an incompatibility with certain versions of Windows, Nvidia graphics processors, and MasterCAM. This solved it on my computer, but I haven’t had a chance to test this elsewhere yet.
( Tool Library with 15/32 bit
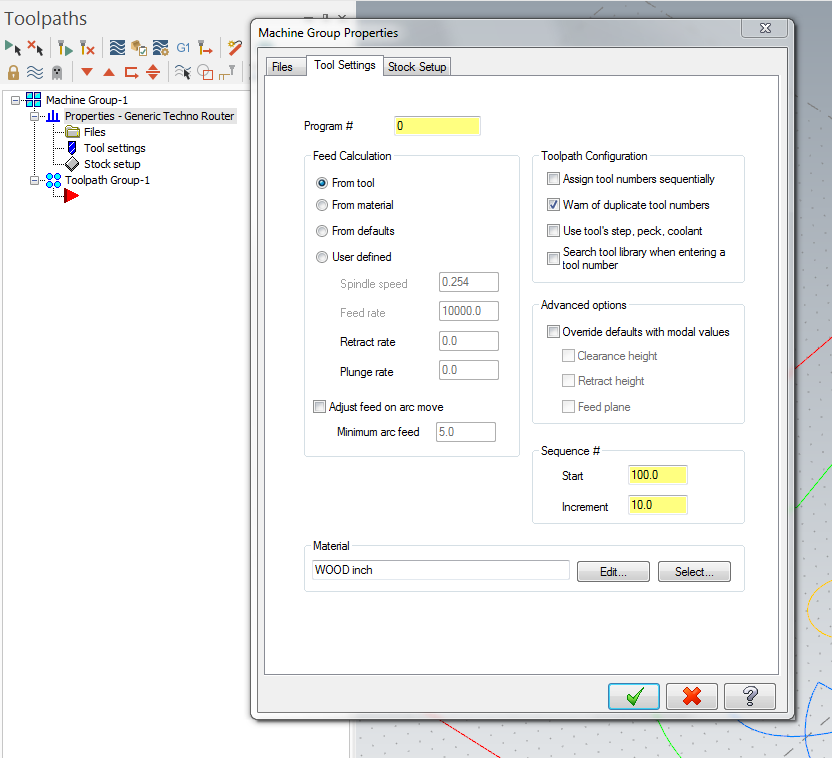
Sorry we did not post this sooner, but you can get the tool library with the 15/32 bit below. You will see that this tool is tool #8 in this library. You should go back into your operations and choose this tool. You should also make sure that your tool settings are not set to “assign tool numbers sequentially”. If you do have it set to assign tool numbers sequentially, the first tool you select will be called #1, regardless of which tool it is in the library. This will cause your part to cut with the wrong tool. See the image below for a reminder where you access this option.
http://3d2018.christopherspecce.com/wp-content/uploads/2018/04/BANK_TOOLS_2015PlywoodBit.zip
If for some reason you don’t see this tool as an options from the library, be sure to uncheck the option for “Filter Active”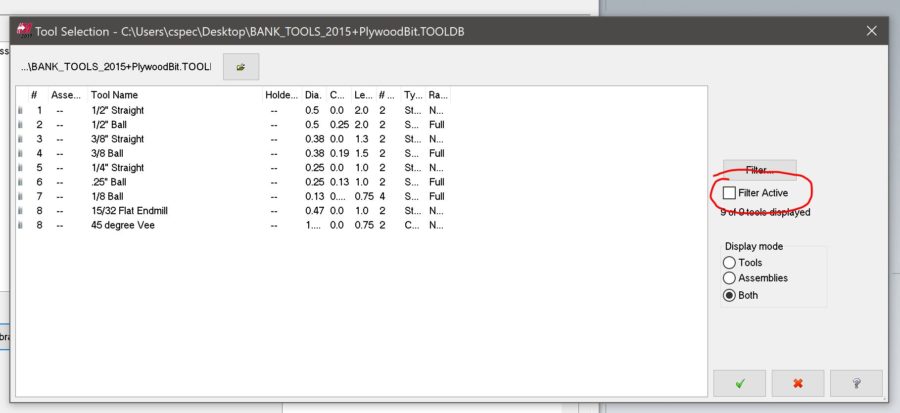
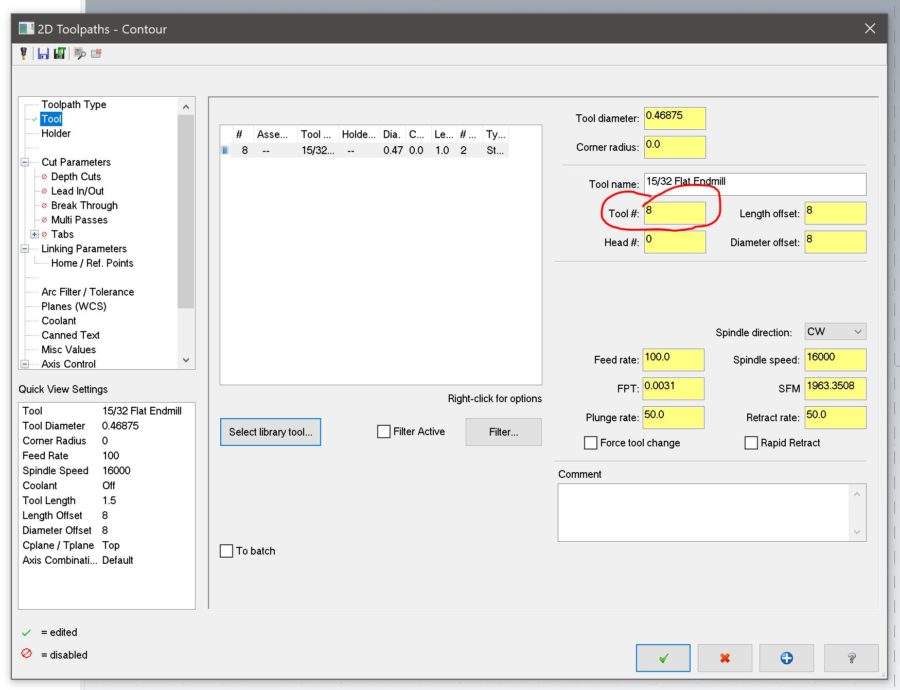
If you have the correct tool – “15/32 Flat Endmill”, but the tool number is wrong (maybe assign tool numbers sequentially was checked), you can just go in an change the tool number:
( Where to find and buy Parallels, Windows
In order to install Windows on your Mac, you will need to install Parallels. You can start with the trial version of Parallels, and download the free Student edition of Windows from https://risd.onthehub.com . Be sure to give yourself plenty of time for downloading and installing as the files are quite large. If you have downloaded your free copy of Windows 10 previously while at RISD, you will not see an option to get Windows as they only allow you to download the OS once. Check the bottom of this post for more information.
Once you download the Windows 10 ISO (the installer file) and Parallels, install Parallels first. It will then guide you through installing a virtual machine (where you will run Windows). You will need the ISO file on your computer or a USB thumb drive and your License key but the install should be fairly automated with Parallels.

This is what you should see for windows once you add it to your cart. You don’t need to add the “Extended Access Guarantee”, but this will provide you 24 months of access to download the software or view your key. Otherwise, your access to download is limited to approximately 1 month and your keys are in the confirmation email you receive when you purchase.
Can’t Find or Access Windows on onthehub?
If you previously installed or downloaded Windows 10 from onthehub, you will need to find the email that contains your license key that was sent when you originally. If you don’t have this you’ll need to talk to OIT to retrieve it or pay for a new license. You can get the ISO file (the disk image of the installer) from OIT, another student or we will try to have Marylin have a USB drive you can check out with the file.
( Commenting in Google Docs
Part of the homework is to comment on someone else’s project. There are several ways to do this, but all start with opening the google doc you want to comment on (duh):
- select the text you wish to comment on
- go to Insert>Comment (you can also use the shortcut command+alt+M on Mac, or ctrl+alt+M on Windows)
- type your comment into the field that appears
- click on the comment button
or
- float the cursor along the right edge of the page near the section you want to comment on until an icon of a talk bubble with a document in it
- click on this button
- type your comment into the field that appears
- click on the comment button
As reminder, you are supposed to comment on the person whose last name is after your’s alphabetically (this exercise is for your benefit, so no need to comment on my post – it’s not included in this list). The last person in the order should comment on the first person. Here is a list of the class’s last names:
- Attias
- Barthel
- Bell
- Blum
- Chen
- Do
- Emy
- Gerasimoff
- Gillman
- Gutbrod
- Herrera Matiz
- Hetfield
- Humphrey
- Hutchinson
- Kusaba
- Li
- Mitrovic
- Robertson
- Rower
- Sherpa
- Silver
- Valenti
- Venegas
- Warren
( Rhino 6 import to Keyshot issues
If you are using windows and installed Rhino 6, Keyshot will not recognize a Rhino 6 .3dm file. To work around this, save your rhino file as a version 5 file. Keyshot will most likely be updated to work with Rhino 6 shortly. In the meantime, the Keyshot plugin for Rhino works between Rhino 6 and Keyshot.
( Keyshot Plug-in for Rhino
There is a plug-in available for Rhino that enables “Live Linking” from Rhino to Keyshot:
“With LiveLinking, your modeling application and KeyShot are connected (via the plugin). With it, you can continue to work in the 3D modeling application after the initial transfer to KeyShot. At any point in time you can update your designs in KeyShot with the simple push of a button. Only the changed parts and layers will be transferred to KeyShot, without the loss of any materials, animations, lighting nor camera setup.”
Get the plugin here:
https://www.keyshot.com/resources/downloads/plugins/
scroll down until you see the Rhino logo, click on the logo, then choose the appropriate operating system. Once you have the plugin installed, you can read the instruction below for how to use it (windows and mac have differences in how to use it).
See this page for details on how to use it:
https://luxion.atlassian.net/wiki/spaces/KP/pages/38414838/Rhinoceros
( Download Keyshot
You can download Keyshot from the link below. Select the “Full Installer” for your operating system:
https://www.keyshot.com/resources/downloads/
You will need to get a license from me in person, but it will work in demo mode in the meantime. I will be distributing licenses at 1:30 pm on Friday (2/21) in Prov Wash.
( Watch Videos Faster (or slower)
Some of the the videos I will post are sped up to compensate for how slowly I typically speak, but not all of them are. If you find a video is too fast or slow, you can get a browser extension that will let you speed up or slow down the videos as you like.
Chrome:
Playback speed for embedded vimeo
Playback Rate
FireFox:
Faster Video
I’m sure there are similar options for Safari and other browsers, but I can’t seem to find a free one.
( Use the Middle Mouse Button for Increased Productivity!!!!!
In both the Windows and Mac versions of Rhino you can customize the pop-up menu that appears when you click on the middle mouse button. You’ll see me do this often when I’m working in Rhino – it’s a huge productivity booster.
To customize in Windows:
Click the middle mouse button
click on the small gray bar at the top of the menu – this will “dock” the menu
remove items from the menu by holding shift as you drag them off the menu and into the workspace
add items by holding CTRL as you drag from an existing toolbar into the menu
To customize on the Mac:
http://discourse.mcneel.com/t/cant-customize-middle-mouse-button-popup-toolbar/4044
( Apple Magic Mouse + Rhino
If you have the Apple Magic Mouse and are using it with Rhino, you might find there are some things about it that are not ideal. There are a couple of tricks that might improve the behavior the mouse that you can try setting up.
If the virtual “scroll” is too fast, go to Rhino > Preferences > View > Zoom, and change to Scale factor value to a value closer to 1 to slow down the zooming speed.
You can also try the third party mouse control application called Magic Prefs that allows you to make more detailed adjustments to the mouse settings than the System Preferences panel allows.
( Download Rhino
Get the evaluation versions for Rhino
Rhino 6 for Windows
Rhino 5 for Mac
-
Classroom
-
